Download Red Hat Certified Engineer (RHCE).EX300.PracticeTest.2018-01-31.40q.vcex
| Vendor: | RedHat |
| Exam Code: | EX300 |
| Exam Name: | Red Hat Certified Engineer (RHCE) |
| Date: | Jan 31, 2018 |
| File Size: | 700 KB |
| Downloads: | 1 |
How to open VCEX files?
Files with VCEX extension can be opened by ProfExam Simulator.
Discount: 20%
Demo Questions
Question 1
Cofigure SELINUX
Modify the state of selinux to Enforcing mode
Use VIM /etc/selinux
- See Explanation
Correct answer: A
Explanation:
vim /etc/selinux/config SELINUX=enforcing :wqreboot vim /etc/selinux/config
SELINUX=enforcing
:wq
reboot
Question 2
Configure the SSH Access as required:
Users can visit your two virtual machine systems via clients of domain group3.example.com through SSH remote
- See Explanation
Correct answer: A
Explanation:
Modify file /etc/hosts.allow Add a line: sshd: 172.24.11. Modify file /etc/hosts.deny Add a line: sshd: 172.25.0. Both of them need to be configured There is a solution 2: Add a firewall firewall-cmd –zone=block --add-source=172.25.11.0/24 --permanent firewall-cmd –reload Both of them need to be configured Modify file /etc/hosts.allow
Add a line: sshd: 172.24.11.
Modify file /etc/hosts.deny
Add a line: sshd: 172.25.0.
Both of them need to be configured
There is a solution 2: Add a firewall
firewall-cmd –zone=block --add-source=172.25.11.0/24 --permanent firewall-cmd –reload
Both of them need to be configured
Question 3
Custom User Environment
Create a custom command on system1 and system2 named as qstat, this custome command will execute the following commands:
/bin/ps - Ao pid,tt,user,fname,rsz
This command is valid for all users in the system
- See Explanation
Correct answer: A
Explanation:
vim /etc/bashrc // restart and keep valid alias qstat=’/bin/ps -Ao pid,tt,user,fname,rsz’ :wqsource /etc/bashrc alias // check if there is a qstat qstat // execute vim /etc/bashrc // restart and keep valid
alias qstat=’/bin/ps -Ao pid,tt,user,fname,rsz’
:wq
source /etc/bashrc
alias // check if there is a qstat qstat // execute
Question 4
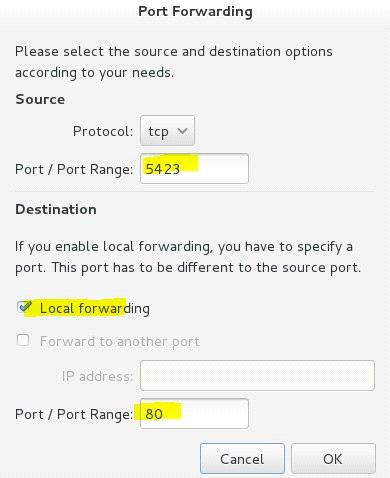
Configure port forwarding on the system1, as required:
1. Systems in the network 172.24.11.0/24, local port 5423 will be ported to 80 when visiting system1
This setting must be valid permanently
- See Explanation
Correct answer: A
Explanation:
Use Graphical interface to configure Use firewall-config to open the Graphical interface in CLI Adjust the configuration: drop-down menu to permanent Adding a strategy to the port forward of the public region
systemctl restart firewalld.service // reload the firewall strategy Use Graphical interface to configure
Use firewall-config to open the Graphical interface in CLI Adjust the configuration: drop-down menu to permanent Adding a strategy to the port forward of the public region

systemctl restart firewalld.service // reload the firewall strategy
Question 5
Configure the Link Aggreation
Configure a link between systeml. group3.example.com and system2. group3.example.com as required:
- This link use interface eth1 and eth
- This link still can work when one interface failed
- This link use the following address 172.16.3.20/255.255.255.0 in systeml
- This link use the following address 172.16.3.25/255.255.255.0 in in system2
- This link remains normal after the system is restarted
- See Explanation
Correct answer: A
Explanation:
If forget how to write the name, can search examples in /var/share/doc/team-1.9/example_configs/nmcli connection add con-name team0 type team ifname team0 config '{"runner":{"name":"activebackup"}}'nmcli con modify team0 ipv4.addresses '172.16.11.25/24' nmcli connection modify team0 ipv4.method manual nmcli connection add type team-slave con-name team0-p1 ifname eth1 master team0 nmcli connection add type team-slave con-name team0-p2 ifname eth2 master team0 nmcli connection up team0 nmcli con up team0-p1 nmcli con up team0-p2 If forget how to write the name, can search examples in /var/share/doc/team-1.9/example_configs/
nmcli connection add con-name team0 type team ifname team0 config
'{"runner":{"name":"activebackup"}}'
nmcli con modify team0 ipv4.addresses '172.16.11.25/24'
nmcli connection modify team0 ipv4.method manual
nmcli connection add type team-slave con-name team0-p1 ifname eth1
master team0
nmcli connection add type team-slave con-name team0-p2 ifname eth2
master team0
nmcli connection up team0
nmcli con up team0-p1
nmcli con up team0-p2
Question 6
Configure IPV6 Address
Configure interface eth0 on your test system, using the following IPV6 addresses:
:::system1 address should be: 2003acl8305/64
:::system2 address should be: 2003acl830a/64
:Both the two systems must can communicate with systems in network 2003acl8/64
Addresses must be valid after the restart
Both the two systems must keep the current IPV4 address and can communicate
- See Explanation
Correct answer: A
Explanation:
nmcli con mod eth0 ipv6.addresses “2003:ac18::305/64”nmcli con mod eth0 ipv6.method manual systemctl restart network nmcli con mod eth0 ipv6.addresses “2003:ac18::30a/64”nmcli con mod eth0 ipv6.method manual systemctl restart network ping6 2003:ac18::30a nmcli con mod eth0 ipv6.addresses “2003:ac18::305/64”
nmcli con mod eth0 ipv6.method manual
systemctl restart network
nmcli con mod eth0 ipv6.addresses “2003:ac18::30a/64”
nmcli con mod eth0 ipv6.method manual
systemctl restart network
ping6 2003:ac18::30a
Question 7
Configure the local mail service
Configure the mail service on system1 and system2, as required:
- These systems do not accept external send mails
- Any mails sent locally are automatically routed to rhgls.domain11.example.com
- Mails sent from these systems will be displayed from rhgls.domain11.example.com
- You can send mail to local user ‘authur’ to test your configuration system rhgls.domain11.example.com
- Have already configured to transfer this user’s mails to the following URL rhgls.domain11.example.com/received_mail/11
- See Explanation
Correct answer: A
Explanation:
postconf -e local_transport=err:XX vim /etc/postfix/main.cf relayhost=[rhgls.domain11.exmaple.com] postconf -e myorigin=domain11.example.com systemctl restart postfix echo aaa | mail -S hello dave Open rhgls.domain11.example.com/received_mail/11 in the browser postconf -e local_transport=err:XX vim
/etc/postfix/main.cf
relayhost=[rhgls.domain11.exmaple.com]
postconf -e
myorigin=domain11.example.com systemctl
restart postfix echo aaa | mail -S
hello dave
Open rhgls.domain11.example.com/received_mail/11 in the browser
Question 8
Share directories via SMB
Configure the SMB service on the system1
Your SMB server must be a member of the work group STAFF
Share /common and share name must be common
Only clients of domain11.example.com can access the common share
Common must be able to browse
User andy must be able to read the content of the share, if necessary, verfication code is redhat
- See Explanation
Correct answer: A
Explanation:
system1: yum -y install samba samba-client firewall-cmd --add-service=samba –permanent firewall-cmd --add-service=mountd –permanent systemctl restart firewalld vim /etc/samba/smb.conf workgroup = STAFF [common] path = /common hosts allow = 172.24.11. browseable = yes :wq mkdir /common chcon –R –t samba_share_t /common/ smbpasswd -a andy systemctl start smb systemctl enable samba system2:yum install –y cifs-utils samba-client system1:
yum -y install samba samba-client
firewall-cmd --add-service=samba –permanent
firewall-cmd --add-service=mountd –permanent
systemctl restart firewalld
vim /etc/samba/smb.conf
workgroup = STAFF
[common]
path = /common
hosts allow = 172.24.11.
browseable = yes
:wq
mkdir /common
chcon –R –t samba_share_t /common/
smbpasswd -a andy
systemctl start smb
systemctl enable samba
system2:
yum install –y cifs-utils samba-client
Question 9
Configure Multi-User Mount
Share the directory /devops through SMB on the systeml, as required:
- Share name is devops
- The shared directory devops just can be used by clients in domain11.example.com
- The shared directory devop must be able to be browsed
- User silene must can be able to access this share through read, access code is redhat
- User akira must can be able to access this share through read and write, access code is redhat
- This share permanently mount to system2. domain11.example.com the user /mnt/dev, make user silene as authentication any users can get temporary write permissions from akira
- See Explanation
Correct answer: A
Explanation:
:system1 mkdir /devops chcon -R -t samba_share_t /devops/ chmod o+w /devops/ vim /etc/samba/smb.conf [devops] path = /devops hosts allow = 172.24.11. browseable = yes writable = no write list = akira :wqsystemctl restart smb smbpasswd -a silene smbpasswd -a akira system2 mkdir /mnt/dev smbclient -L /system1/ -U silene vim /etc/fstab //system1/devops /mnt/dev cifs defaults,multiuser,username=silene,password=redhat,sec=ntlmssp 0 0 df –hT :system1
mkdir /devops
chcon -R -t samba_share_t /devops/
chmod o+w /devops/
vim /etc/samba/smb.conf
[devops]
path = /devops
hosts allow = 172.24.11.
browseable = yes
writable = no
write list = akira
:wq
systemctl restart smb
smbpasswd -a silene
smbpasswd -a akira
system2
mkdir /mnt/dev
smbclient -L /system1/ -U silene
vim /etc/fstab
//system1/devops /mnt/dev cifs
defaults,multiuser,username=silene,password=redhat,sec=ntlmssp 0 0
df –hT
Question 10
Mount a NFS Share
Mount a NFS share to system1.domain11.example.com on the system2, as required:
- Mount the /public to the directory /mnt/nfsmount
- Mount the /protected to the directory /mnt/nfssecure, in a security way, key download URL:http://host.domain11.example.com/materials/nfs_client.keytab
- User deepak can creat files on /mnt/nfssecure/project
- These file systemes automatically hang up when the system is started
- See Explanation
Correct answer: A
Explanation:
system2: showmount –e system1 mkdir -p /mnt/nfsmount vim /etc/fstab system1:/public/mnt/nfsmount nfs defaults 0 0 mount –a df –h mkdir /mnt/nfssecure wget -O /etc/krb5.keytab http://host.domain11.example.com/materials/nfs_client.keytabvim /etc/fstab system1:/protected /mnt/nfssecure nfs defaults,sec=krb5p,v4.2 0 0:wqmount -a system2:
showmount –e system1
mkdir -p /mnt/nfsmount
vim /etc/fstab
system1:/public
/mnt/nfsmount nfs defaults 0 0
mount –a
df –h
mkdir /mnt/nfssecure
wget -O /etc/krb5.keytab
http://host.domain11.example.com/materials/nfs_client.keytab
vim /etc/fstab
system1:/protected /mnt/nfssecure nfs defaults,sec=krb5p,v4.2 0 0
:wq
mount -a
HOW TO OPEN VCE FILES
Use VCE Exam Simulator to open VCE files

HOW TO OPEN VCEX AND EXAM FILES
Use ProfExam Simulator to open VCEX and EXAM files


ProfExam at a 20% markdown
You have the opportunity to purchase ProfExam at a 20% reduced price
Get Now!


